Capturing Screen Shots
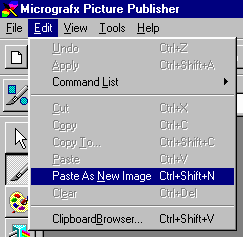
This document does not require use of the scanner; however, the imageediting programs that came with the scanner have this capability. Thisis how we captured many of the pictures that are used on this Web Siteincluding the one below. StepsThe Windows Clipboard has the ability to capture screens. 1. Get the program on screen that you wish to capture a screen shotfrom. 2. If you wish to capture the entire screen, press the PRINT SCRN buttonon your keyboard. The screen is now on your clipboard. 3. If you only want to capture a smaller window and not the entire screen,hold down the CTRL key and then press the PRINT SCRN button.Whichever window was active when you did this is now on the Windows Clipboard. 4. Start iPhoto Plus or Picture Publisher and follow the steps below. a. iPhoto Plus Steps: 1) In iPhoto Plus, open the Edit Menu. 2) Click on Clipboard and select Save To File. 3) Give the file a name of your choice. 4) Click on the File Menu and you will see the name of your new filenear the bottom. Click it to open your newly captured screen. 5) You may now edit the file as needed. 6) When done editing, save your changes and then import the file intoany document you wish to use it in. b. Picture Publisher Steps: 1) In Picture Publisher, open the Edit Menu.
2) Click Paste As New Image. 3) You may now edit the image as needed. (For this image, I capturedthe entire screen then cropped out the portion shown above.) 4) When done editing, save your changes and then import the file intoany document you wish to use it in. (I saved the file as a *.GIF fileand then used my HTML Editor to place it in this document.) |