| |   | | | Scan Dialog Box/Direct Scan Tutorial Part 1: When to Use the Scan Dialog box Part 2: Accessing the Scan Dialog box Part 3: Components of the Scan Dialog box Part 4: Using the Scan Dialog box
| OCR (NOTE: OCR, or Optical Character Recognition, is a function designed to covert a black and white text document into a document that can be edited in a word processing program. Unlike copying a document, an OCR program literally "reads" the scanned document and attempts to recognize the shapes of the letters so that it may convert them into the format recognized by word processing programs. There are limits to what OCR programs can recognize, and they will not be able to read documents with handwriting or cursive scripts, forms or graphically intensive documents. See Understanding OCR for more information.) Clicking on the OCR icon brings up the following options: 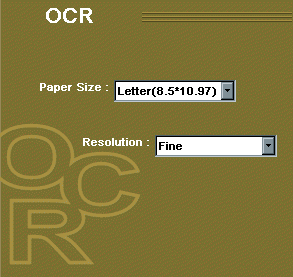
- Select the Paper Size from the pull-down menu. The choices include A4, Letter, and, depending on the scanner model, Legal or A3. There is also an option called Auto. This will make the scanner do a prescan first and then crop to the edge of the document so that only it is scanned.
- Choose a Resolution. The menu gives the options for Fine or Superfine. Fine is generally the best choice for scanning most documents.
- Once everything is selected on the OCR options screen, click on the Scan Command icon on the right-hand side. The Scan Dialog box will disappear and a small progress indicator will appear. After the scan has completed, another window will appear showing the OCR recognition process taking place.
- After the recognition phase, a window will appear called the Inbox. In the Inbox window will be a thumbnail representing our converted document.
- Double-click the thumbnail to display the document in the Notepad. The document can then be edited, printed, or cut-and-pasted to another word processing program, such as Microsoft Word. There may be characters known as tildes (~) in the document. These are letters that the OCR program couldn’t recognize. If there are a lot of tildes or misspelled words, either try the OCR again with the Superfine resolution, or try using it directly with the TextBridge Classic OCR program that came with the scanner. (Consult the TextBridge Classic Tutorial for more information on this program.)
| | To learn how to use a function, click on its icon. | | Scan | Copy | Fax | E-mail | OCR | | 
| 
| 
| 
| 
| | | | | |